SDK Setup (Windows)
This page is all about getting your Windows machine compiling code for the nRF9160 Feather. Run into trouble during the process? Post your questions on the community forum.
IDE Setup
- Install or use the code editor of your choice. I personally use Microsoft Visual Studio Code. The download link is here
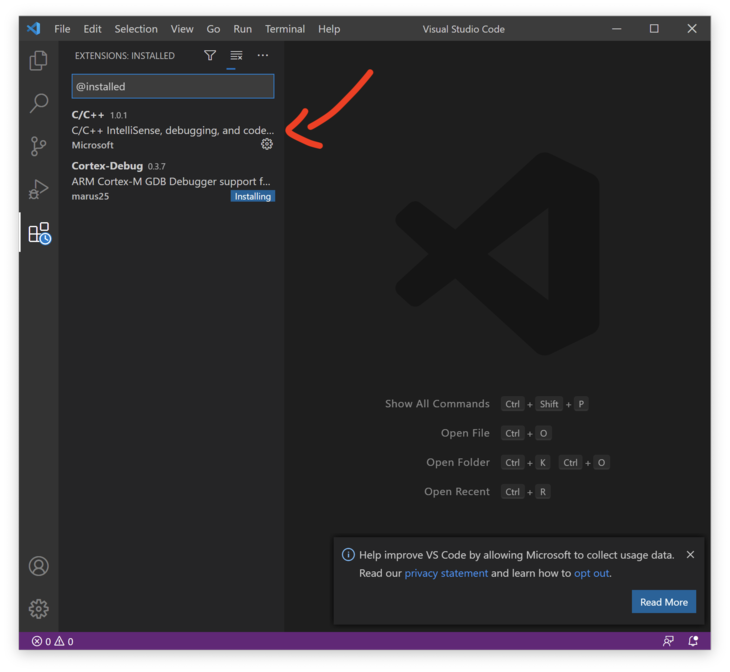
- If you decide to use Visual Studio Code, make sure you install the C/C++ and Cortex-Debug extentions using the built in extension marketplace.

SDK Install
-
Install the Chocolatey (
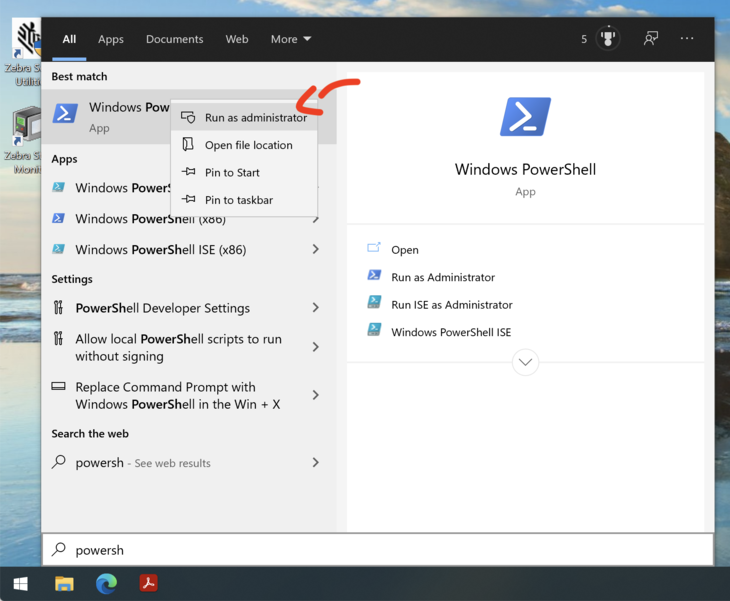
choco) package manager. In the start menu typecmdthen right click and open with Administrative Privledges.
-
Then paste the install script and press enter:
Set-ExecutionPolicy Bypass -Scope Process -Force; [System.Net.ServicePointManager]::SecurityProtocol = [System.Net.ServicePointManager]::SecurityProtocol -bor 3072; iex ((New-Object System.Net.WebClient).DownloadString('https://chocolatey.org/install.ps1'))For more info check out this page.
-
Now, lets install the remaining deps we'll need for Zephyr/nRF Connect using
choco. In a newcmd.exesession (with Administrator privledges) run:choco feature enable -n allowGlobalConfirmation choco install cmake --installargs 'ADD_CMAKE_TO_PATH=System' --version 3.18.5 choco install ninja gperf python git -
Next install
westusingpip. West is the most important utility for using nRF Connect SDK & Zephyr. You'll become quite familliar with very soon.pip install west💡Note: you can update
westby issuingpip3 install -U westIt will uninstall the version on your machine and replace it with the latest. (It won't do anything if you have the latest installed.) -
Now create a folder on your machine and call it
nfed(short for nRF9160 Feather Examples and Drivers). For windows it's best to put it inC:\. Open a newcmd.exeprompt in this folder and initialize nRF Connect SDK usingwest:cd C:\ mkdir nfed cd nfed west init -m https://github.com/circuitdojo/nrf9160-feather-examples-and-drivers --mr main -
Once your nRF Connect SDK compontents are downloaded, you'll need to fetch the remaining SDK:
west updateYou'll see a bunch of output go by as
westdownloads dependencies using Git. (This will take hot minute so make sure you're prepared with something else to do. 😬)Here's what your
nfedfolder should look like:C:\nfed>dir Volume in drive C has no label. Volume Serial Number is B013-63F8 Directory of C:\nfed 10/27/2020 12:25 PM <DIR> . 10/27/2020 12:25 PM <DIR> .. 10/27/2020 12:22 PM <DIR> .west 10/27/2020 12:24 PM <DIR> bootloader 10/27/2020 12:25 PM <DIR> mbedtls 10/27/2020 12:27 PM <DIR> modules 10/27/2020 12:22 PM <DIR> nrf 10/27/2020 12:22 PM <DIR> nr9160-feather 10/27/2020 12:24 PM <DIR> nrfxlib 10/27/2020 12:24 PM <DIR> test 10/27/2020 12:26 PM <DIR> tools 10/27/2020 12:24 PM <DIR> zephyr 0 File(s) 0 bytes 11 Dir(s) 29,099,958,272 bytes free -
Installing the remaining SDK requirements using
pip3:pip3 install -r zephyr/scripts/requirements.txtNote you will get an error during this process related to Visual Studio (not Visual Studio Code). You can ignore this issue.
The ARM Embedded Toolchain
-
You can download and install the toolchain with this direct link.
-
One installed, re-open your prompt (or use the provided DOS prompt that will pop up post install) and run
arm-none-eabi-gcc --versionto make sure it's installed correctly.arm-none-eabi-gcc --version arm-none-eabi-gcc (GNU Arm Embedded Toolchain 9-2019-q4-major) 9.2.1 20191025 (release) Copyright (C) 2019 Free Software Foundation, Inc. This is free software; see the source for copying conditions. There is NO warranty; not even for MERCHANTABILITY or FITNESS FOR A PARTICULAR PURPOSE. -
You will have to set some important environment variables. Here's what they should look like:
setx ZEPHYR_TOOLCHAIN_VARIANT gnuarmemb
setx GNUARMEMB_TOOLCHAIN_PATH "C:\Program Files (x86)\GNU Tools Arm Embedded\9 2019-q4-major"
newtmgr (Used to load your application via USB serial bootloader)
-
For loading code to your nRF9160 Feather, you'll need to download and copy a custom version of
newtmgrto a folder in yourPATH.If you're not sure,
C:\bin\is always a good spot for these types of binaries. -
You'll have to make sure that
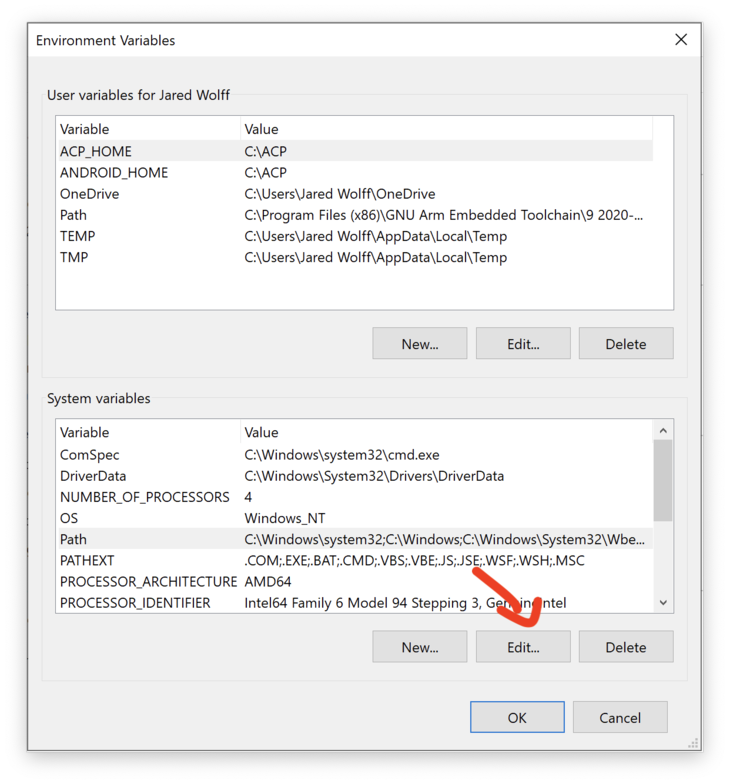
C:\bin\is added to your systemPATH. Hit the start menu or Windows key and type "environment variables". Open the "Edit the system environment variables." option. -
Go to the System variables section and find path.
-
Click Edit

-
Click New
-
Enter C:\bin\ into the new line.
-
Press Ok for the remaining prompts.
-
Then, you'll need to add your serial profile to make it easier to download/update your device:
newtmgr conn add serial type=serial connstring="dev=COM5,baud=1000000"Make sure that the COM port matches the one attached to the nRF9160 Feather. An easy way to check is to remove and add the device to see which COM port shows up in device manager.
-
Having trouble? You may need to install the Silabs VCP driver.. Download and install the CP210x VCP Windows option.
For more info in using newtmgr checkout the programming section of this documentation.
Testing it
You can quickly test if your SDK is set up correctly by checking out the samples. Make sure that you've closed and re-opened all terminals and Visual Studio Code so the environment is correct. Otherwise you may have issues compiling or flashing code.